This post may contain affiliate links. If you make a purchase through these links, I may earn a commission at no additional cost to you. Learn more about our affiliate policy.
Setting up a WordPress site for your lifestyle blog is one of those things that often gets delayed longer than it should. Not because it is especially difficult, but because it feels technical, permanent, and easy to get wrong.
I’ve watched many capable, thoughtful people stall here, even when they already know what they want to write and who they want to reach.
What usually helps is not more tutorials, but a calmer sequence. WordPress setup becomes manageable when you focus only on what matters right now and let everything else wait.
This guide follows the exact order I use when setting up a new blog using Hostinger, so you can move through it without spiraling or second-guessing.

What You Actually Need Before You Start
Before clicking into any setup screen, it helps to understand the three basic pieces involved.
You need:
- Hosting, which is where your site lives online
- A domain name, which is the address people type to find your blog
- WordPress, which is the software that powers the site
These pieces often feel confusing because they are explained separately. One reason I often recommend Hostinger is that it brings all three together in a single flow. That removes the need to connect systems manually or make technical decisions you don’t yet need to understand.
You do not need prior experience for this. You just need to follow the steps in order.
Step 1 Sign Up With Hostinger and Start a WordPress Site

Once you choose a plan and sign up with Hostinger, you will be guided through their onboarding process. The Premium plan is plenty to get started with.
When you are asked what you want to create, choose the option to create a WordPress website. This choice matters because it triggers automatic setup in the background.
You are not installing WordPress yourself. Hostinger does that as part of the process, which eliminates one of the most intimidating steps people associate with WordPress. I use this flow because it removes unnecessary friction at the very beginning.
Step 2 Create Your WordPress Login Details

During setup, you will be asked to create login details for your WordPress account. You will enter your email address, and Hostinger will automatically generate a secure password for you.
This is a moment to slow down slightly. Save this password somewhere secure or write it down. These details are for WordPress itself, not just your hosting account, and you will need them to log into your site.
You can always change the password later. For now, the goal is simply to know where it is.
Step 3 Choose How You Want to Build Your Site

Next, Hostinger will ask how you would like to build your website. You will typically see options such as using AI or choosing pre-built websites and themes.
For a blog, choose pre-built websites and themes. This gives you structure without locking you into a system you don’t understand yet. It also integrates cleanly with WordPress’s own customization tools, which you will use later.
This choice is not a commitment to a final design. It is simply a starting framework.
Step 4 Select a Starter Theme Without Overthinking

Hostinger will then show you a selection of starter themes, and you can filter for those well-suited for blogs. You can scroll and choose one that feels visually calm and readable.
If this step feels overwhelming, there is an equally good alternative. WordPress comes with a default theme already installed, such as Twenty Twenty Six. This theme is minimal, clean, and perfectly functional as a starting point.
I often remind people that themes are containers, not identities. You can change them later without losing your content.
Step 5 Let Hostinger Install the Recommended Plugins

During setup, Hostinger will recommend a small set of plugins. Leave these selected. I do this on new sites as well because they cover essential functionality without adding clutter.
These typically include tools like LiteSpeed Cache for performance and a contact form plugin so visitors can reach you. This gives your site a solid baseline without requiring you to research plugins immediately.
More plugins can come later if needed. For now, simplicity supports momentum.
Step 6 Connect Your Domain
You will then be prompted to select or purchase a domain. With all Hostinger hosting plans, you get a free domain name for the first year!
This is the address people will use to access your blog.
Choose a domain that is easy to read and easy to spell. It does not need to be clever or layered with meaning. Clarity matters more than creativity here.
Find more tips for choosing the best domain when you plan your lifestyle blog brand here.
This step often feels bigger than it is. In practice, it simply gives your site a permanent address so it can exist publicly.
Step 7 Access Your WordPress Dashboard
Once setup is complete, you can access your WordPress dashboard by visiting yourdomain.com/wp-admin. Use the email and password you created earlier.
The dashboard can feel like a lot the first time you see it. That feeling is normal and temporary. You will not use most of the menus right away.
For now, just notice where things live. Familiarity builds through use, not exploration.
Step 8 Customize Your Theme the Simple Way

If you chose a starter theme such as Astra, you can customize it directly from the WordPress admin panel. Look for Astra in the sidebar and select Customize.
This opens the visual customizer, where changes appear in real time. Start with the basics only. Upload a logo if you have one. Adjust colors and fonts if something feels off. Set up a clean header so navigation is clear.
I recommend stopping before things feel complicated. Early customization should support clarity, not perfection.
Step 9 Do a Basic Setup Pass
Once your site is live and accessible, it helps to do a short setup pass so it feels complete enough to use.
Focus on a few essentials:
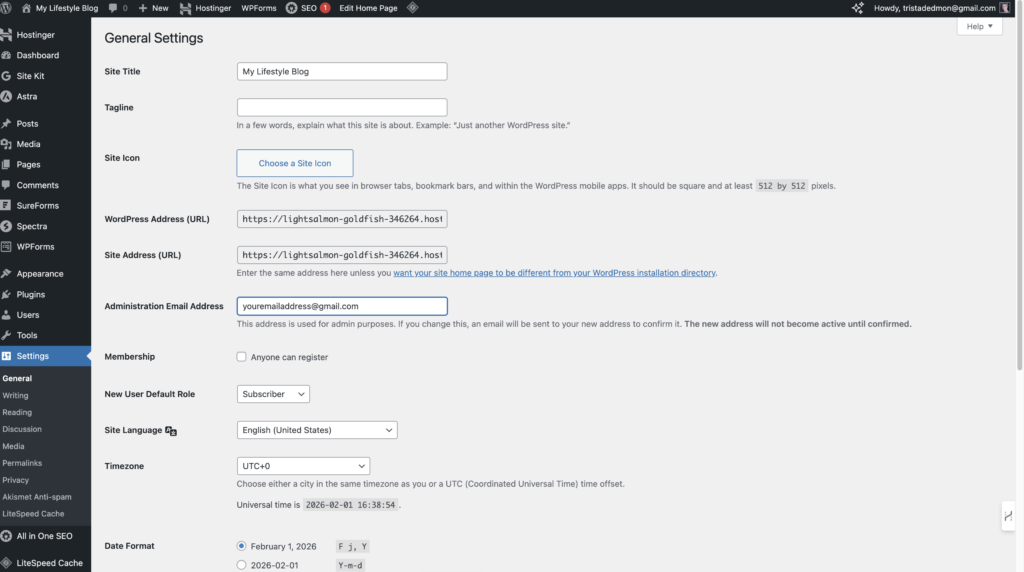
- Set your site title and tagline under Settings > General
- Update The About page under Pages
- Create a Contact page Under Pages > Add Page if your theme does not already have one. You can set up the settings for this under WP Forms.
- Write one simple blog post.
This gives your site structure and signals that it is active. It does not need to be polished.
What to Skip for Now
One of the most helpful things you can do during WordPress setup is decide what not to do yet. Many people lose momentum by trying to optimize too early.
You can safely skip:
- Advanced SEO plugins
- Page builders and complex layouts
- Analytics dashboards
- Deep plugin comparisons
Nothing breaks if these wait. In fact, waiting often keeps your site cleaner.
What Comes Next
Setting up WordPress is a foundation step, not a final one. Once your site exists, the most important thing is to begin using it consistently.
Writing posts, learning gradually, and refining over time builds confidence faster than trying to master everything upfront. Most stable blogs did not begin with perfect design or systems. They began with a working site and a steady rhythm.
WordPress becomes easier the more familiar it becomes. You do not need to master it today. You only need to start.
Ready to build a profitable blog?
The Dream Blog Starter Vault is the complete, step-by-step path to a blog that earns passive income while you live your life.
Open the Vault